API Request
The API Request Module is a configurable component within a workflow that enables ezto verify to interact with external APIs. Similar to Postman or other API testing tools, this module integrates directly into your onboarding/verification flow, allowing you to send requests and process responses from external services.
It can send API requests to external services, facilitating interaction with various systems or applications. With fields for request headers, methods, body types, and content types, the API Request Module is a comprehensive tool for making outbound API requests.
Key Features
Flexible Request Methods: Supports multiple HTTP methods, including GET, POST, PUT, PATCH, and DELETE, offering versatility in how data is fetched or modified.
Content and Body Customization: Choose from a variety of content types such as application/json, application/xml, or text/plain for request bodies, and define specific formats that suit your service's requirements.
Authentication Control: Specify whether authentication is required for the API call, ensuring secure integration with third-party services.
Dynamic Integration: Acts as an intermediary between the verification process and external services, making real-time API calls to trigger actions or retrieve necessary data for validation purposes.
By configuring the API Request Module, you enable efficiendt and automated interaction with external services, reducing the need for manual intervention.

How to Setup
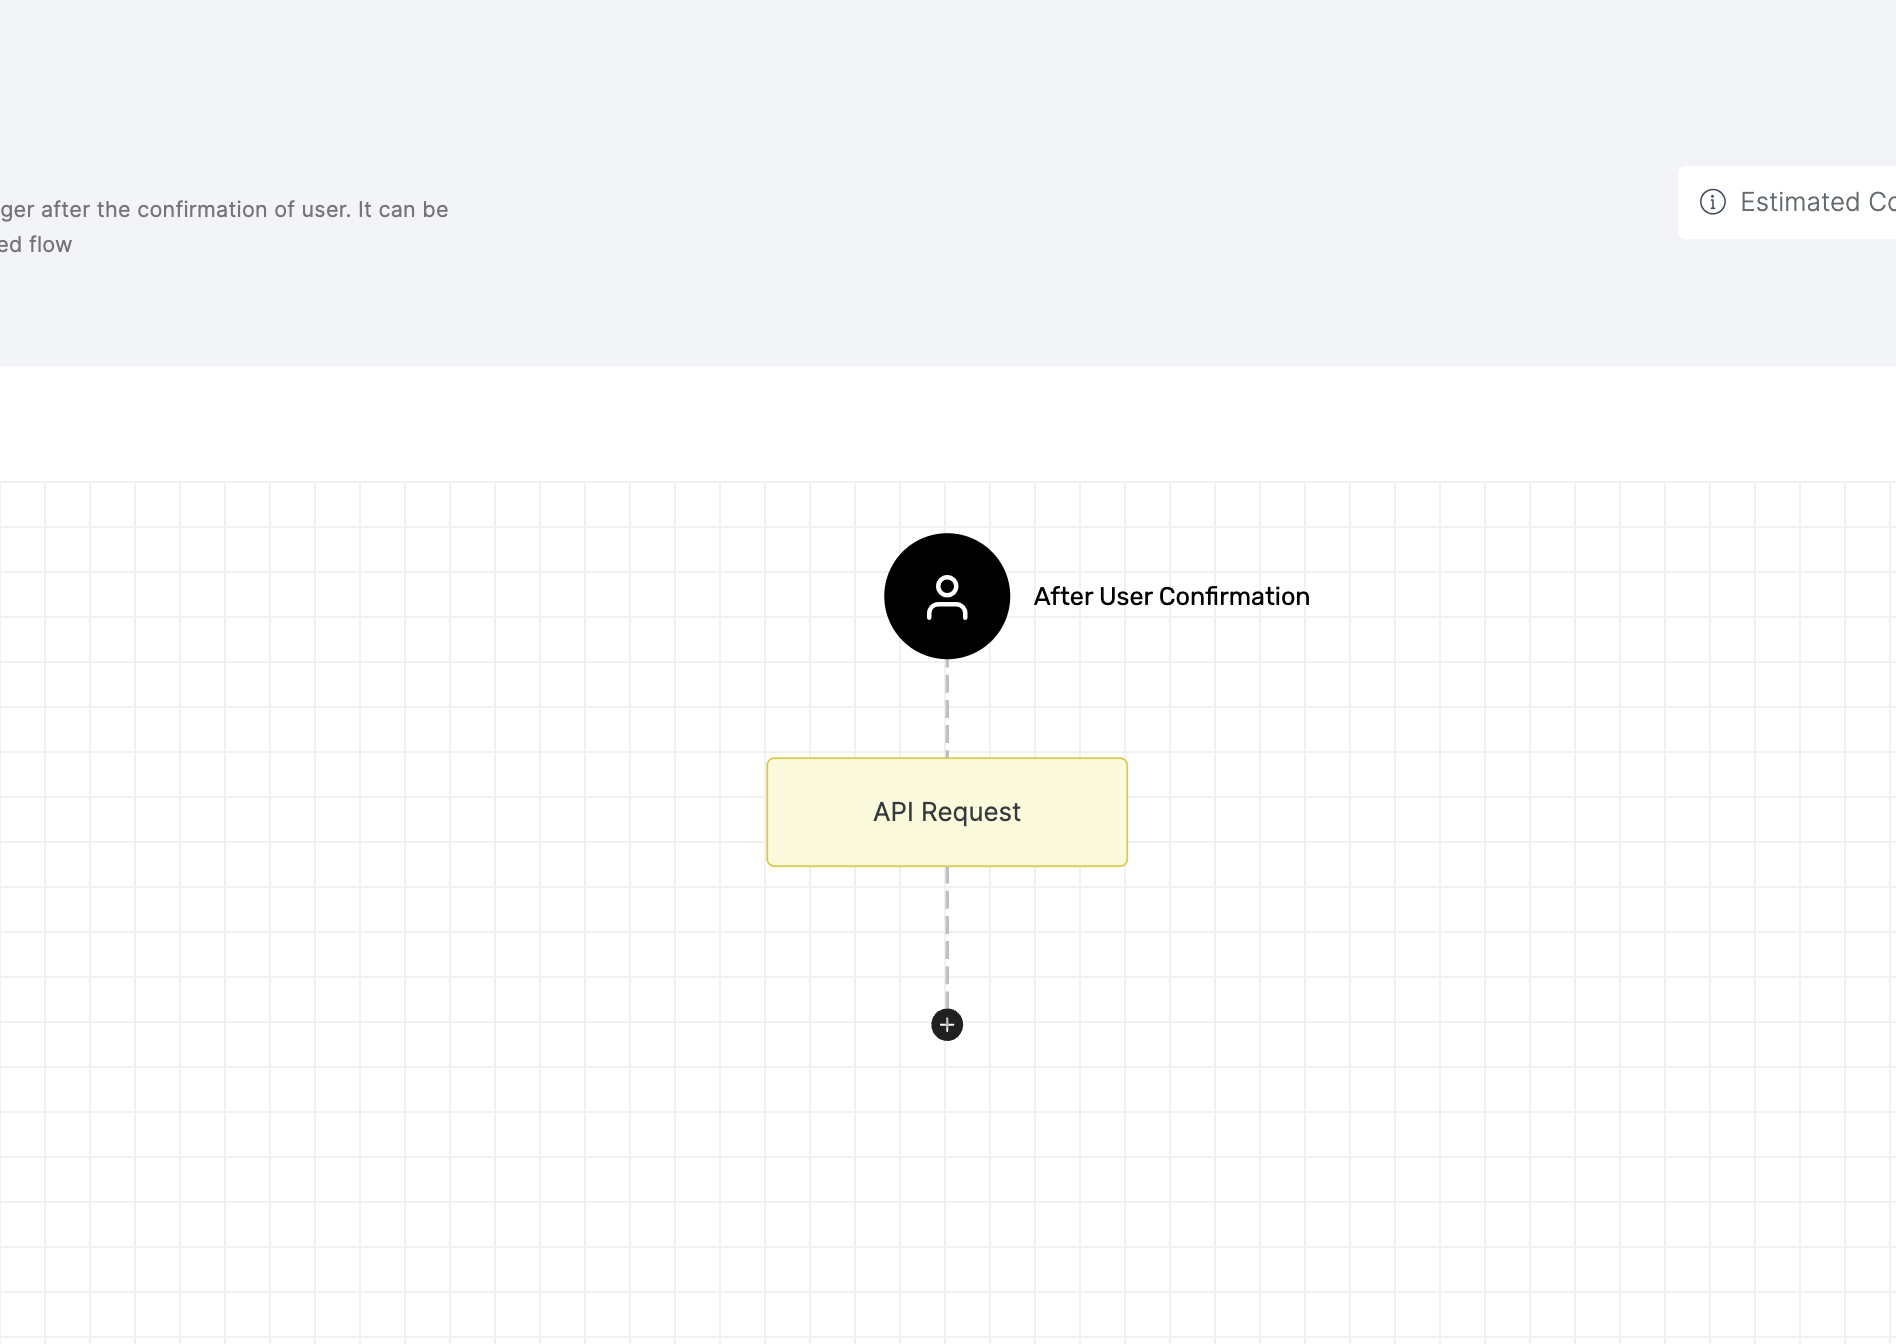
1 Navigate to Workspace > Workflows, and click on the flow created for API Request.
2 Hover over the plus (+) symbol and select API Request to add it.

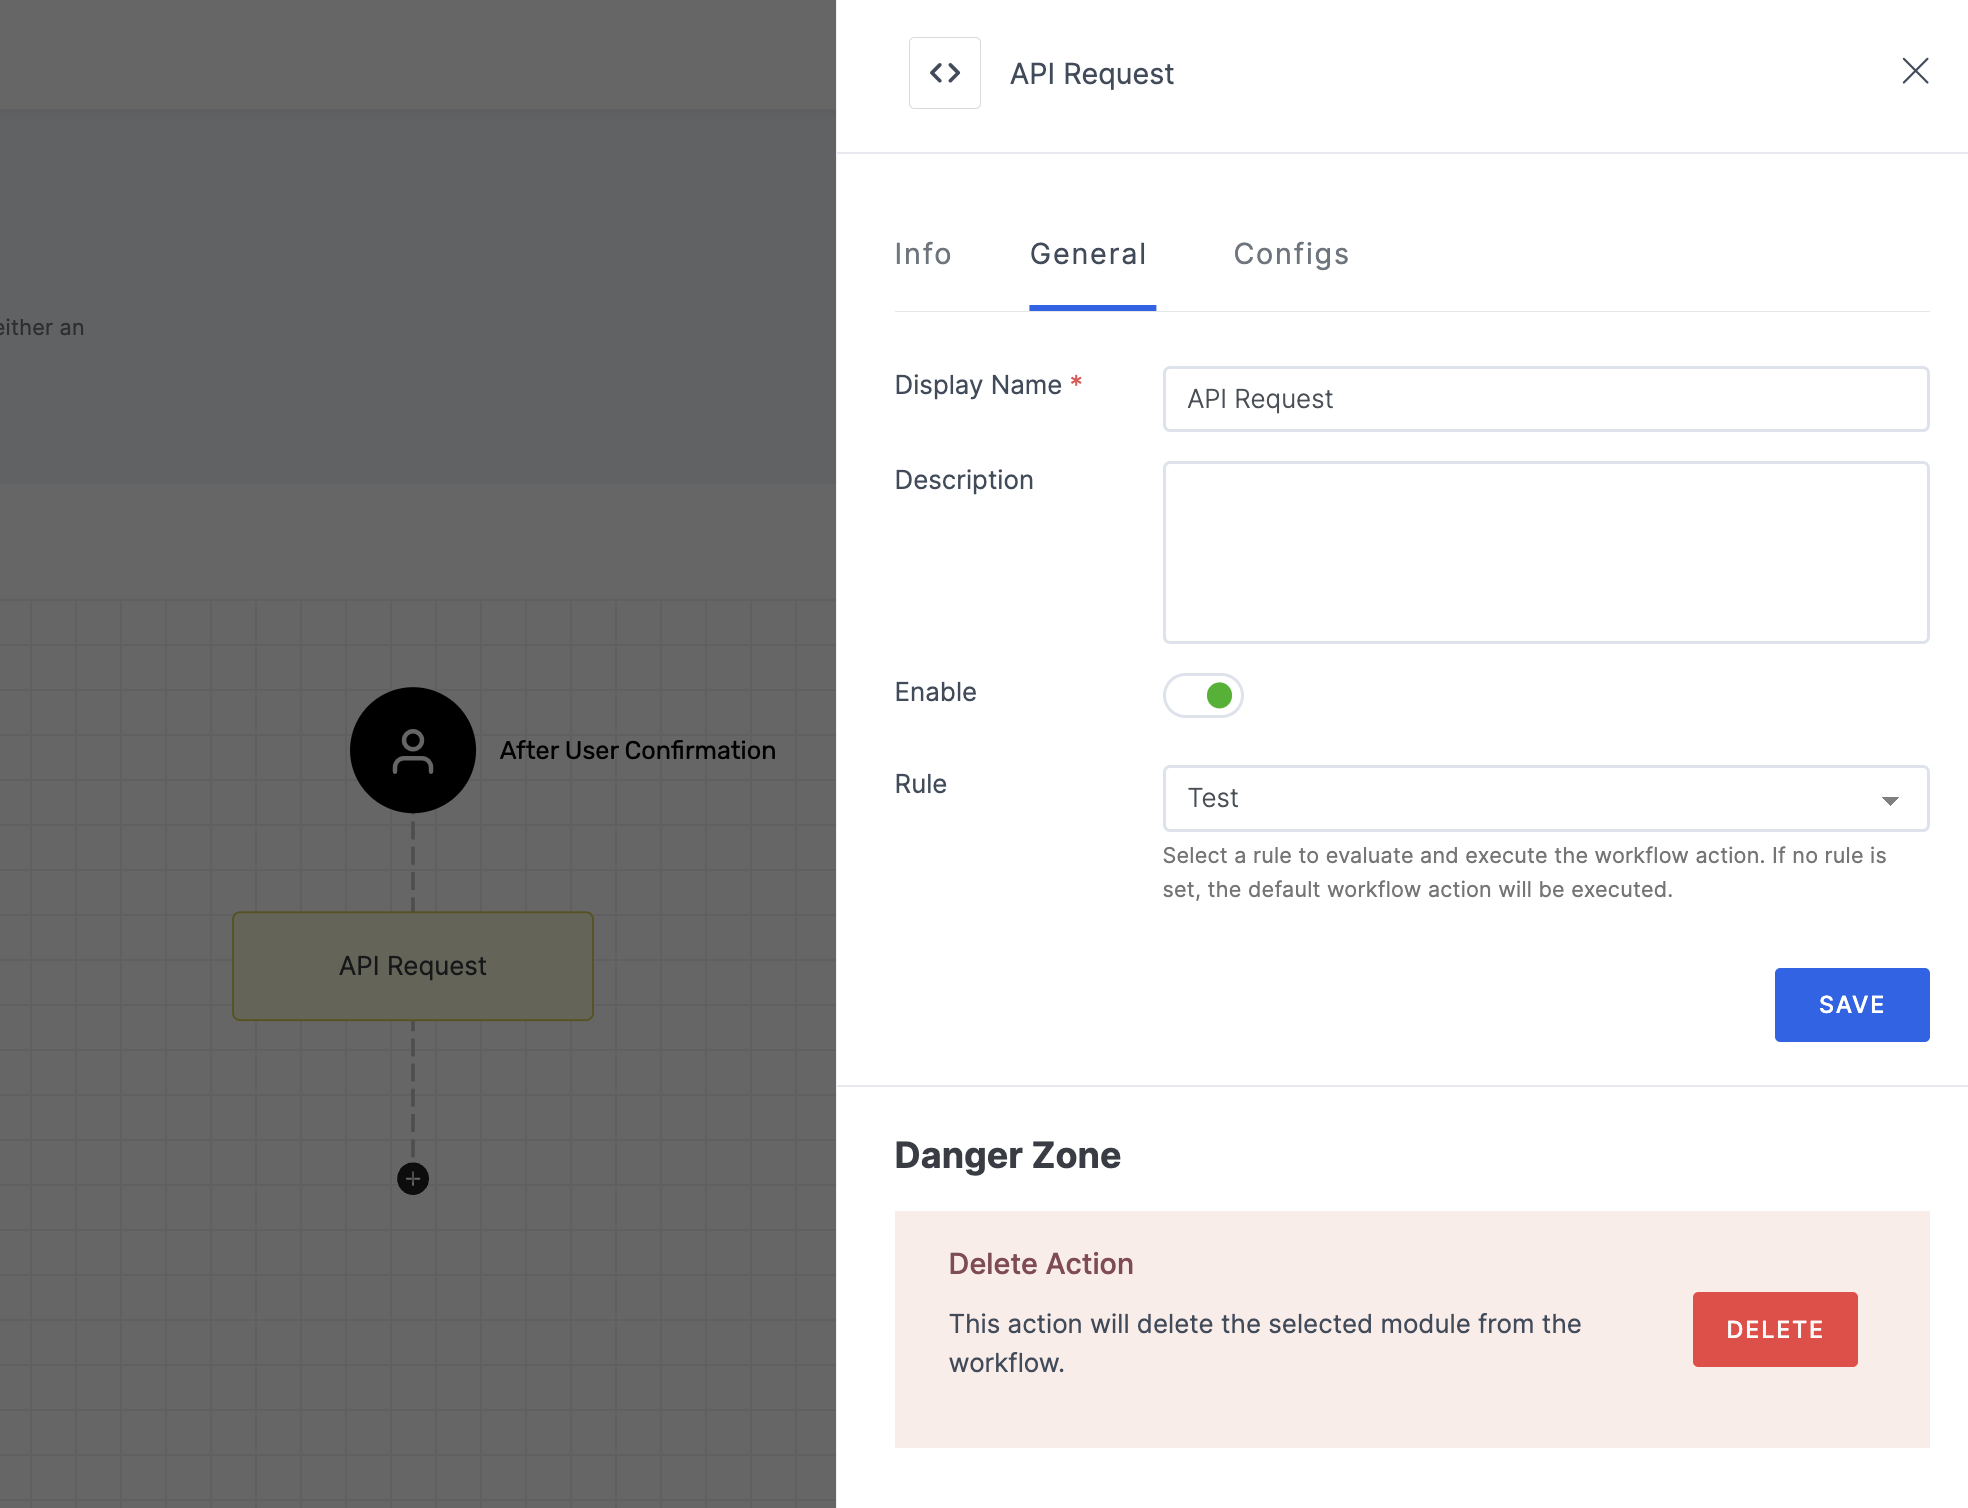
3 Click on the newly added API Request, then select the General tab to customize your preferences.

Manage General
(*) Indicates an action to be mandatory.
| Name | Description |
|---|---|
| Display Name* | Set a name to the workflow for easy identification. |
| Description | Summarize the purpose and functionality of this workflow module. |
| Enable | This toggle is enabled by default. When enabled, the particular workflow module begins its execution. Conversely, if disabled, the workflow module remains inactive and won't proceed. |
| Rule | This determines the criteria for triggering the particular workflow module. When the selected rule is evaluated, and is satisfied, the workflow proceeds as provided. If not, the workflow will not be executed. Note: If no rules are set, the workflow defaults to its standard action without any rule. For more information about the rules, refer here. |
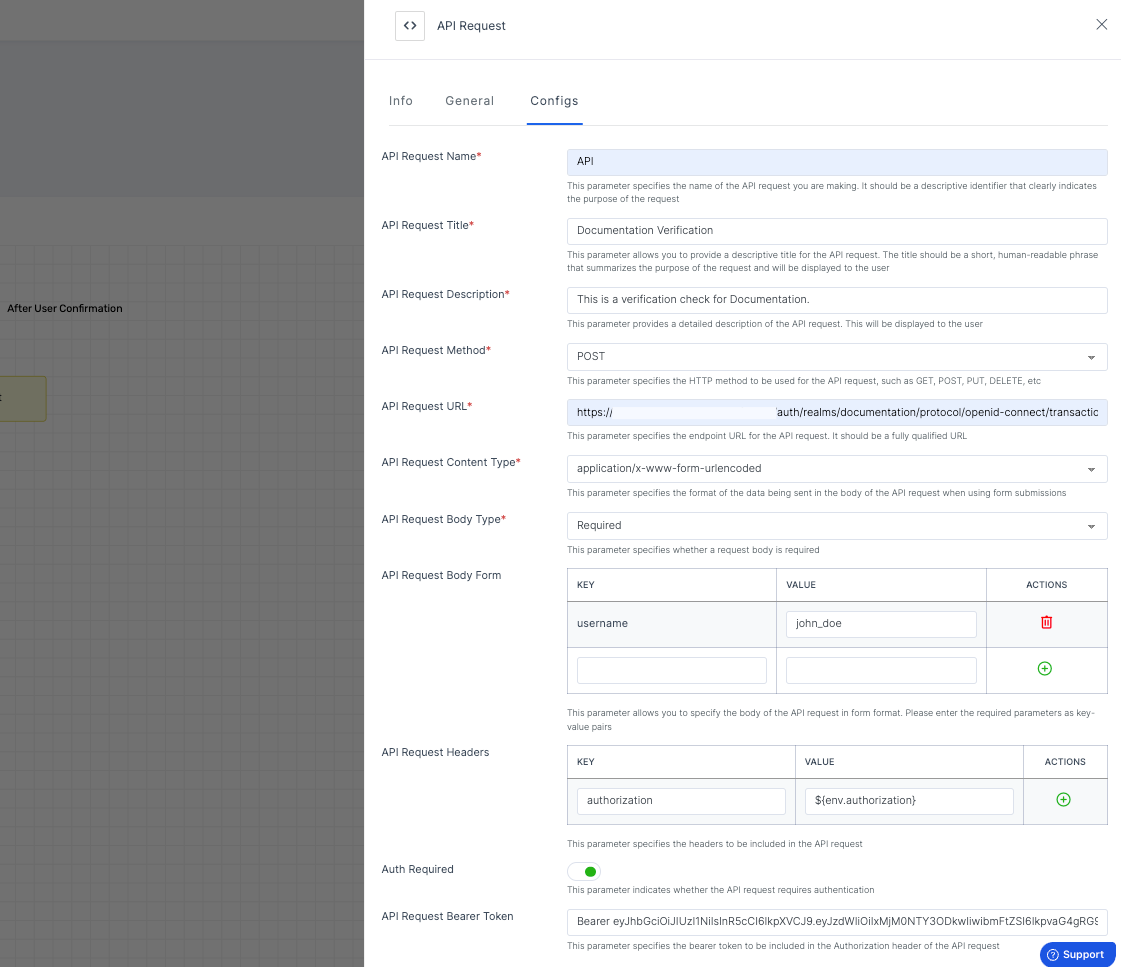
4 Then, click on the Configs tab to set the necessary configurations.

Manage Configs
(*) Indicates an action to be mandatory.
The API Request Module functions through a series of configurations that specify how the external request should be executed:
API Request Name*: This is the identifier for the API request you're setting up. It should clearly describe the purpose of the request, making it easy to reference within the workflow.
Example: "User Details", "Verify PAN".API Request Title*: A human-readable title that summarizes the API request. This will be visible to users interacting with the request in the workflow, providing context about the request's function.
Example: "Documentation Verification", "Send Payment Request".API Request Description*: A detailed explanation of the request's purpose. This can include information about the type of data being retrieved or sent, and how it integrates with the verification process.
API Request Method*: Specifies the HTTP method for the API request, defining the action the API will perform. The available methods are:
- GET: Retrieve data from the server.
- POST: Send new data to the server.
- PUT: Update an existing resource on the server.
- PATCH: Partially update a resource.
- DELETE: Remove a resource from the server.
Example: Use "GET" to fetch user details, or "POST" to create a new user.
API Request URL*: The endpoint URL where the API request is sent. This defines the destination for the API call and indicates where the data is retrieved from or sent to. It must be a fully qualified URL.
API Request Content Type*: Specifies the format of the data being sent to the server so that the server can properly process it. Options include:
- application/json: JSON-formatted data.
- application/x-www-form-urlencoded: Form submission data.
- application/xml: XML-formatted data.
- text/plain: Plain text data.
- text/javascript: JavaScript content.
- text/html: HTML content.
Example: Useapplication/jsonfor sending JSON data.
API Request Body Type*: Indicates whether a request body is needed for the API request. This is typically required for methods like POST or PUT. Set to "None" if no body is needed or "Required" if a body must be provided.
API Request Body Form: If "Required" is selected, the following fields will be displayed for configuring the API Request Body:
Note that, keys and values can only be provided if the API Request Content Type is set to application/x-www-form-urlencoded

For other content types, you can specify additional data to be included in the request body. You can provide the information in various formats such as JSON, XML, or form data, depending on the API requirements

- API Request Headers: This field will appear once an API Request Method is selected

| Name | Description |
|---|---|
| Key | This refers to the name of the header you want to send with your API request. Headers are used to pass metadata with the API request. The key defines what kind of metadata you're sending. |
| Value | The value for the header key can either be static (a predefined value) or dynamic (using environment variables). You can add environment variables in the format "Value": "${env.authorization}". The value complements the key by providing the specific information the server needs to process the request correctly. |
| Actions | This usually includes options to add or delete header entries. It allows you to manage multiple headers for a single API request. You can add new headers, modify the existing key's value, or remove them entirely if not needed. |
Auth Required: A toggle that determines if the API request needs authentication. When enabled, you must provide authentication credentials, such as a bearer token (the only supported method), to ensure secure access to the API. Enable this option when working with APIs that require secure communication.
API Request Bearer Token: The authentication token required for accessing secured APIs. This token will be included in the request headers as part of the authentication process. Ensure the token is up-to-date and has the necessary permissions to interact with the external service. The format for adding the token is
Bearer A1B2C3D4E5F6G7H8I9J0K1L2M3N4O5P6Q7R8S9T0U1V2W3X4Y5Z6
For error codes related to API Request, see here.
5 After you've configured everything needed, click on SAVE.
6 Proceed to attach the workflow to the relevant application for execution. Refer to instructions on how to attach a workflow to an application here.