DNS
Learn how to bring your own custom domain to ezto verify. If you are using the ezto verify host for your verification and workspace, you can add your own custom domain to ezto verify. Please note that this feature is available as part of a paid subscription. For more details on the DNS subscription, refer to the information provided here.
Use your custom domain
1 Navigate to your Workspace and click on Settings.
2 Click on General.
3 Click on the CREATE CUSTOM DOMAIN button.
You can also add multiple custom domains to a single workspace. The first domain you create will automatically be set as the primary domain. However, you can change the primary domain at any time by using the "Make Primary" option.
Please note, only one domain can be designated as the primary at a time. The primary domain cannot be deleted unless you disable the DNS option in your subscription. Additionally, only fully configured domains will appear in the list of available domains.
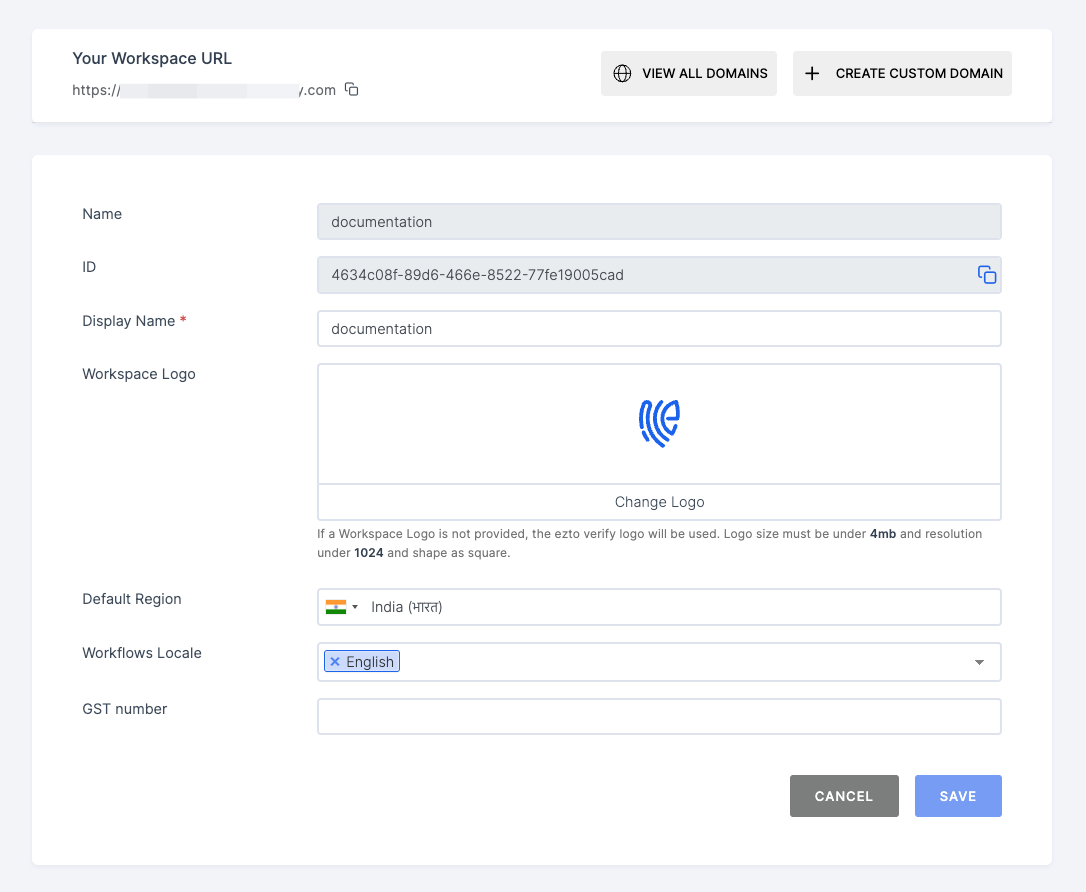
4 The custom domain settings will be opened, enter your custom domain, and click NEXT.
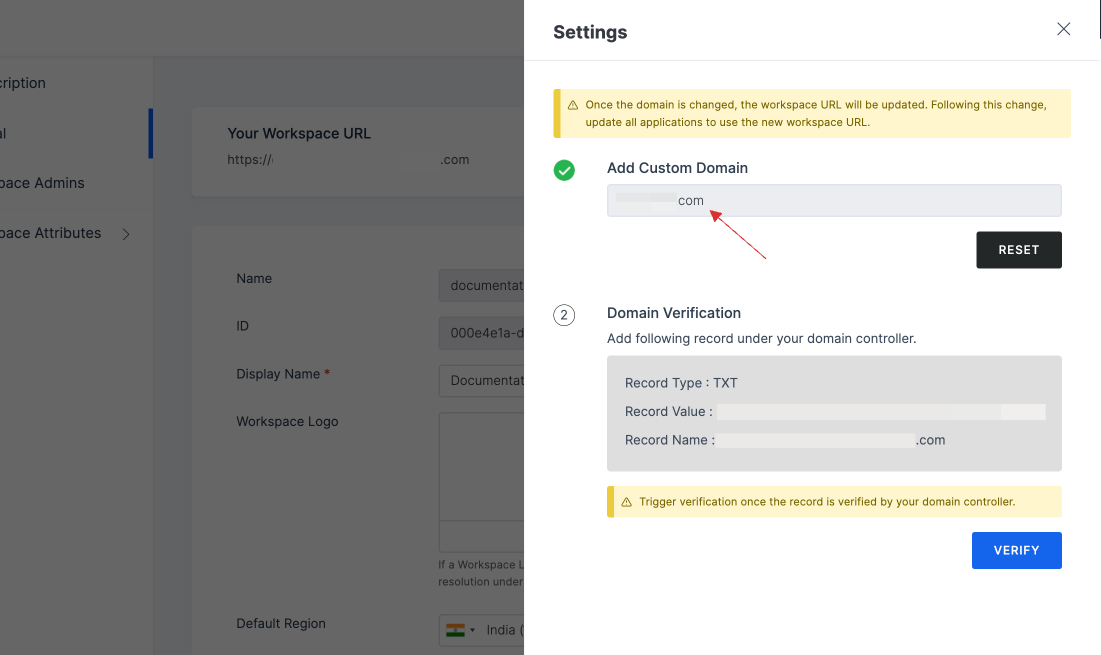
Ensure to trigger the Domain Verification only when the record is verified by your preferred domain controller.
5 Copy the TXT record values to your clipboard.
Create required DNS records
You will create the DNS records needed to connect your domain. As you move through each step, mark the checkboxes to keep track of your progress.
Select the tab that matches your DNS provider below. This gives you a clear, guided instruction on how to create the necessary DNS records. If you don't find your DNS provider listed, follow the Standard instructions.
- Standard Instruction
- Route53
These are standard instructions for creating your DNS records. If you have issues with any of the steps, please contact your DNS provider for more assistance.
Sign into your DNS provider
Find the control panel offered by your DNS provider, where you can sign in to manage your DNS settings.
Find the page to manage the DNS for your domain
Now that you’re logged in, find the section in your provider's control panel where you can manage the DNS records for your domain.
If you’re having issues finding the right page, you can:
- Check if your DNS provider has a help article for adding new DNS records to guide you.
- Contact your DNS provider for additional support.
Create your TXT record
From your DNS control panel, add a new TXT record. This TXT record allows us to verify that you’re the owner of this domain.
Enter these values and save the new DNS record:
| Field | Instructions | Descriptions |
|---|---|---|
| Type | Select TXT from the drop-down. | What kind of DNS record this is. |
| Name | Enter your custom domain here. | For TXT records, this field refers to the subdomain part of your domain. |
| Value | Enter the copied TXT values from your ezto verify Workspace. | This is a lengthy string present in the TXT verification contents. |
| TTL/Expiry | Enter 300. | A 5-minute (300 seconds) expiration is OK. Your DNS provider may not allow you to modify the TTL value. If this field is missing or inaccessible to change it, it is safe to ignore this part of the configuration. |
Verify your TXT record
After you save your DNS record, verify that it has the correct values.
1 Wait up to 10 minutes for your DNS provider to update its nameservers.
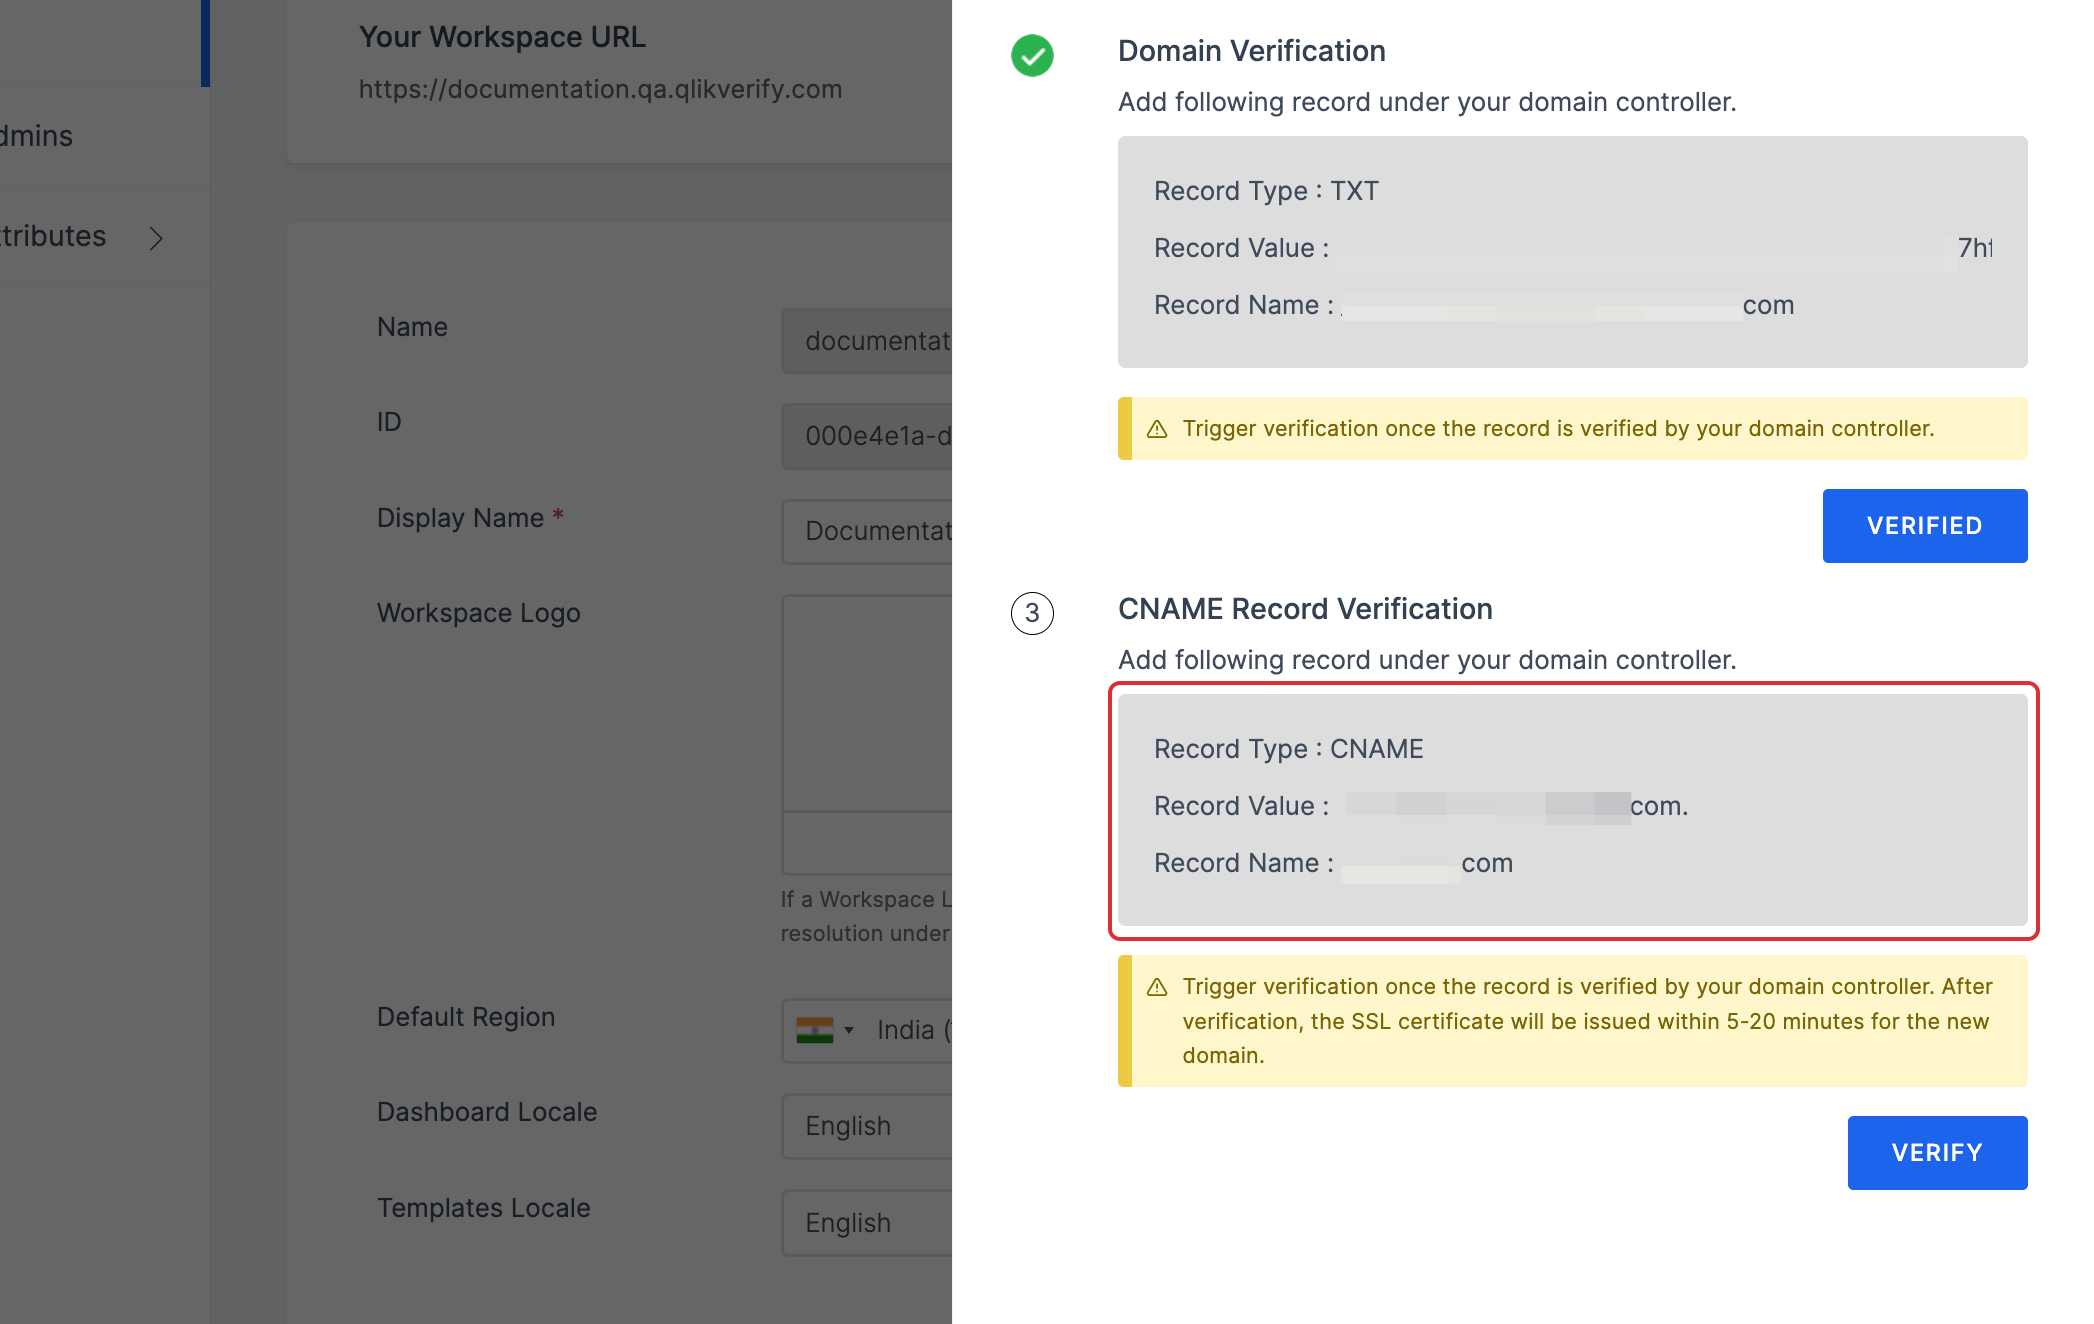
2 Return to your ezto verify Workspace, and click on VERIFY for Domain Verification.
3 You will see the CNAME Record Verification values, this means your Domain Verification is completed.
The CNAME Record Verification values will only be displayed, if the TXT record is successful. Copy the CNAME record values to your clipboard from the ezto verify Workspace.

Create your CNAME record
This CNAME record is what connects your subdomain to ezto verify. Navigate back to your domain controller, add a new record that maps your desired subdomain to ezto verify.
Enter these values and save the new DNS record:
| Field | Instructions | Descriptions |
|---|---|---|
| Type | Select CNAME from the drop-down. | What kind of DNS record this is. |
| Name | Enter your custom domain here. | For CNAME records, this field refers to the subdomain part of your domain. |
| Value | Enter the copied CNAME values from your ezto verify Workspace. | This is a lengthy string present in the CNAME verification contents. |
| TTL/Expiry | Enter 300. | A 5-minute (300 seconds) expiration is OK. Your DNS provider may not allow you to modify the TTL value. If this field is missing or inaccessible to change it, it is safe to ignore this part of the configuration. |
Verify your CNAME record
After you save your DNS record, verify that it has the correct values.
1 Wait up to 10 minutes for your DNS provider to update its nameservers.
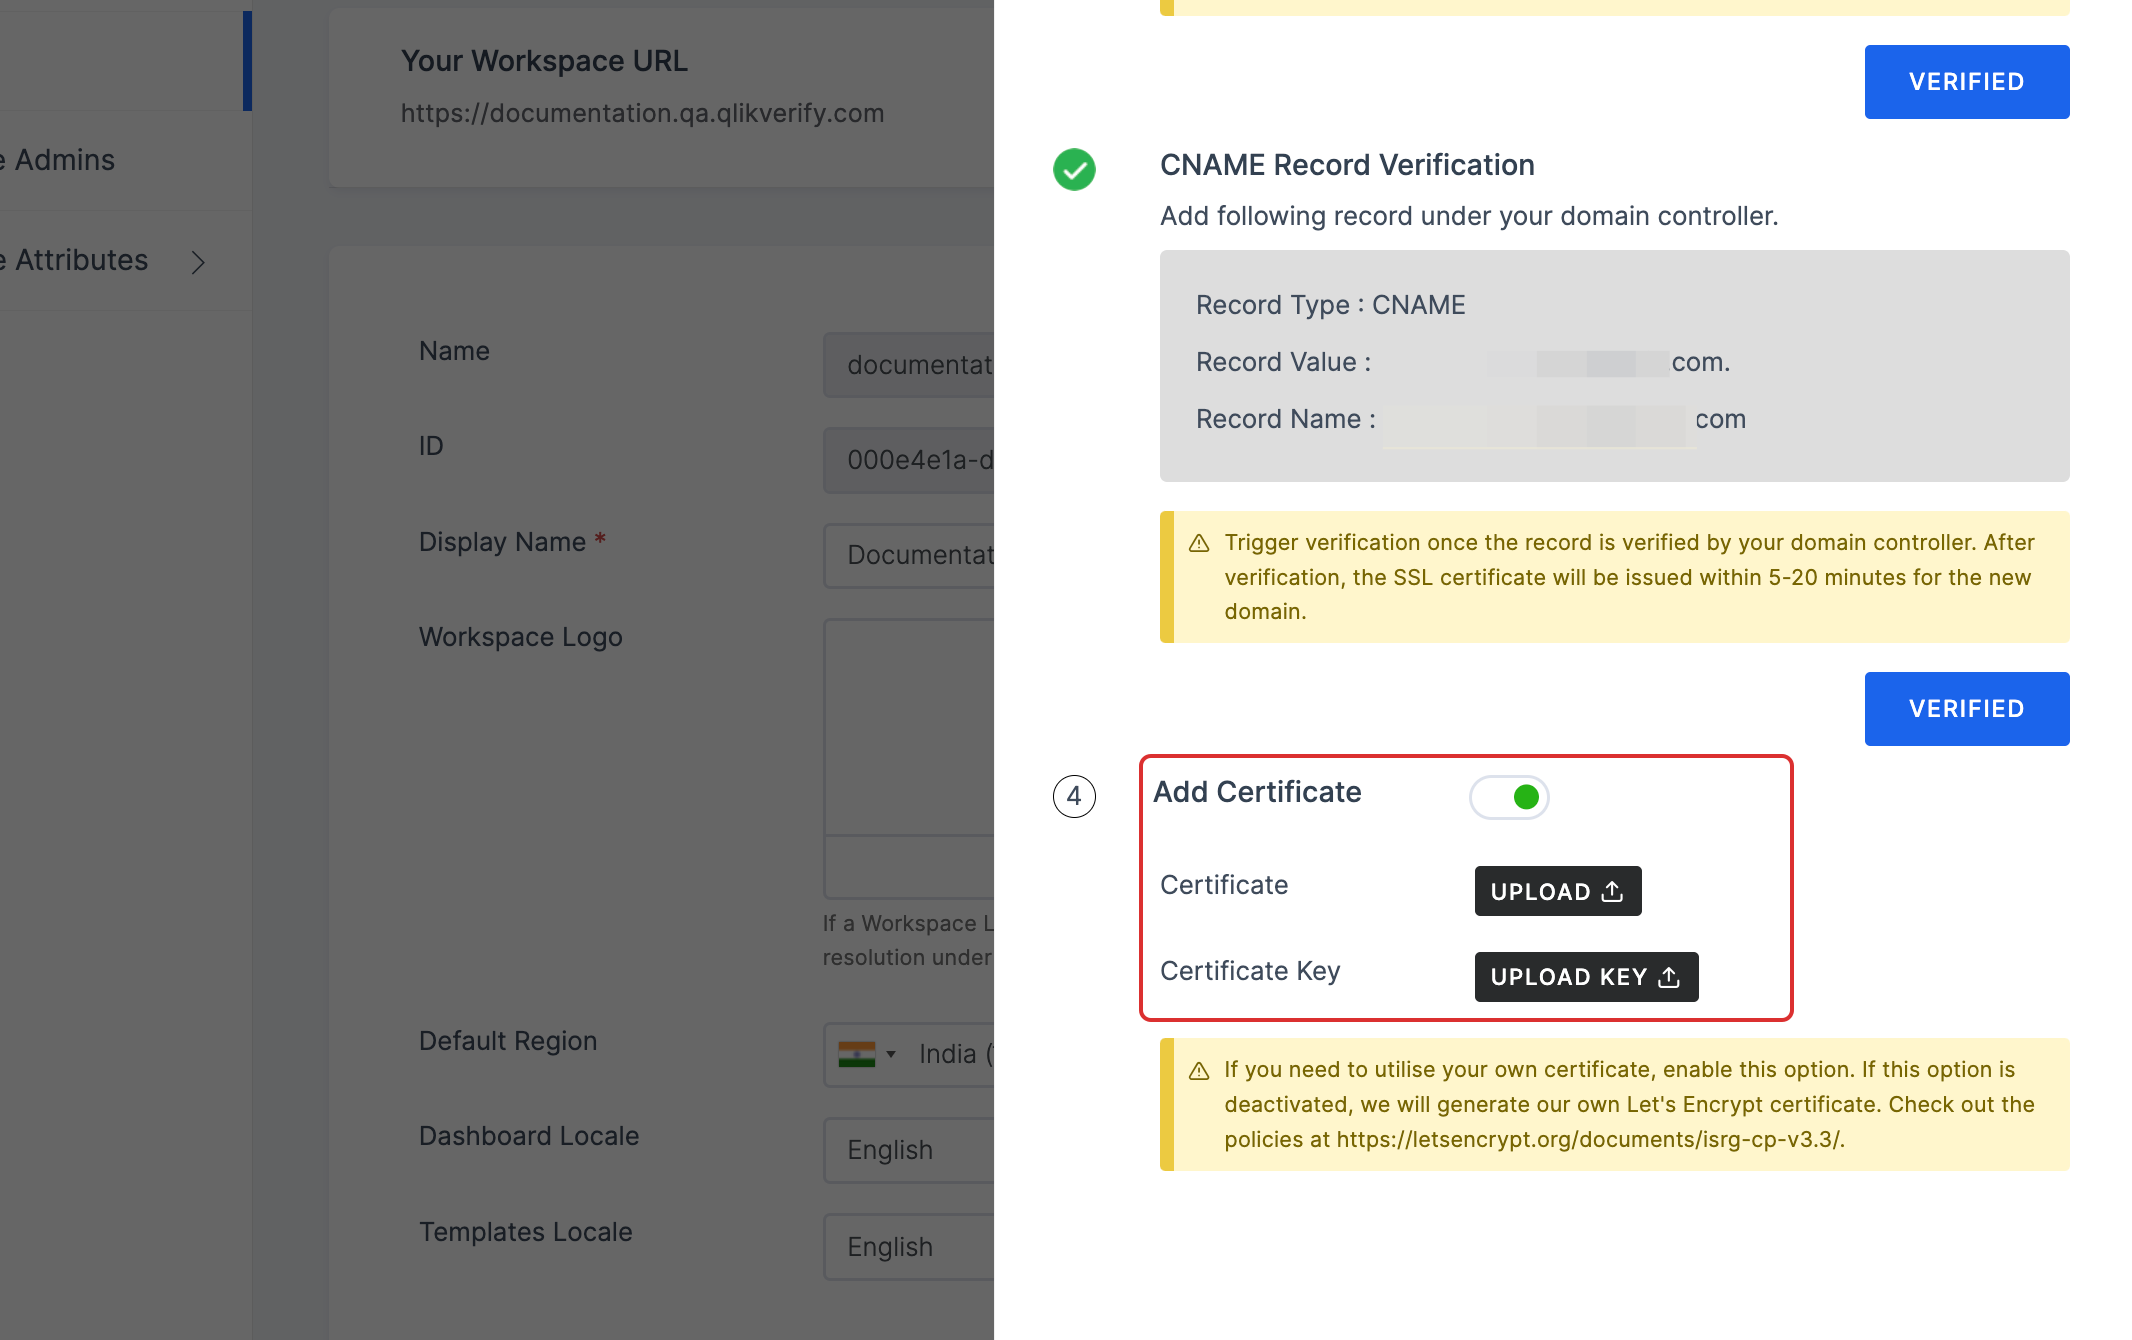
2 Return to your ezto verify Workspace, and click on VERIFY for CNAME Record Verification.
3 You will see the Add Certificate, this means your CNAME Record Verification is completed.
Add Certificate
This step is optional, if you do not have a certificate for this domain. The "Lets's Encrypt" certificate will be generated by default and the Custom Domain setup will be completed without certificate.
But, if you have a certificate for this particular domain. Then, toggle enable, upload the Certificate and Certificate Key.

Use these instructions to create your DNS records with Route53. If you have issues with any of the steps, please contact Route53 support for more assistance.
Sign into Route53
Visit AWS and log into the AWS dashboard.
Navigate to the DNS panel or your domain
From the AWS Dashboard:
- Click on Route53 from you available services.

- You will be taken to the Route 53 dashboard, you should see a DNS management page for your domain, click on the Hosted zones. Choose your preferred host.

- Click on Create Records.
Create your TXT record
From your DNS control panel, add a new TXT record. This TXT record allows us to verify that you’re the owner of this domain.
Enter these values and save the new DNS record:
| Field | Instructions | Descriptions |
|---|---|---|
| Type | Select TXT from the drop-down. | What kind of DNS record this is. |
| Name | Enter your custom domain here. | For TXT records, this field refers to the subdomain part of your domain. |
| Value | Enter the copied TXT values from your ezto verify Workspace. | This is a lengthy string present in the TXT verification contents. |
| TTL/Expiry | Enter 300. | A 5-minute (300 seconds) expiration is OK. Your DNS provider may not allow you to modify the TTL value. If this field is missing or inaccessible to change it, it is safe to ignore this part of the configuration. |
Verify your TXT record
After you save your DNS record, verify that it has the correct values.
1 Wait up to 10 minutes for your DNS provider to update its nameservers.
2 Return to your ezto verify Workspace, and click on VERIFY for Domain Verification.
3 You will see the CNAME Record Verification values, this means your Domain Verification is completed.
The CNAME Record Verification values will only be displayed, if the TXT record is successful. Copy the CNAME record values to your clipboard from the ezto verify Workspace.
Create your CNAME record
This CNAME record is what connects your subdomain to ezto verify. Navigate back to your domain controller, add a new record that maps your desired subdomain to ezto verify.
Enter these values and save the new DNS record:
| Field | Instructions | Descriptions |
|---|---|---|
| Type | Select CNAME from the drop-down. | What kind of DNS record this is. |
| Name | Enter your custom domain here. | For CNAME records, this field refers to the subdomain part of your domain. |
| Value | Enter the copied CNAME values from your ezto verify Workspace. | This is a lengthy string present in the CNAME verification contents. |
| TTL/Expiry | Enter 300. | A 5-minute (300 seconds) expiration is OK. Your DNS provider may not allow you to modify the TTL value. If this field is missing or inaccessible to change it, it is safe to ignore this part of the configuration. |
Verify your CNAME record After you save your DNS record, verify that it has the correct values.
1 Wait up to 10 minutes for your DNS provider to update its nameservers.
2 Return to your ezto verify Workspace, and click on VERIFY for CNAME Record Verification.
3 You will see the Add Certificate, this means your CNAME Record Verification is completed.
Add Certificate
This step is optional, if you do not have a certificate for this domain. The "Lets's Encrypt" certificate will be generated by default and the Custom Domain setup will be completed without certificate.
But, if you have a certificate for this particular domain. Then, toggle enable, upload the Certificate and Certificate Key.
Once all the above records are configured and verified, click on SAVE.
Now that you’ve created your DNS records and verified them, ezto verify verifies the connection and provisions your domain on our end. We’ll send you an email notification when the domain is ready for you to access it.
Optional Removing your custom domain